Ultimate Member Practical Guide ①: Create a user registration form with drag and drop in just 4 steps!
<p class="wp-block-paragraph" style="font-size:18px">Hello, I'm Wakatchi (<a href="https://twitter.com/wakatchi_tech">@wakatchi_tech</a>).</p>
<p class="wp-block-paragraph" style="font-size:18px">When setting up a membership site using WordPress, one of the first challenges you will face is “building a membership registration form.”</p>
<p class="wp-block-paragraph" style="font-size:18px">Although it is possible to manually implement email authentication, role assignment, custom field collection, etc. using PHP, it is not a realistic option when considering maintainability and development costs.</p>
<p class="wp-block-paragraph" style="font-size:18px">One plugin that is attracting attention is the membership site building plugin "<strong><span data-color="#ff6900" style="background: linear-gradient(transparent 60%,rgba(255, 105, 0, 0.7) 0);" class="vk_highlighter">Ultimate Member.</span></strong>"</p>
<p class="wp-block-paragraph" style="font-size:18px">This plugin is known as an “all-purpose form maker” that comes with a drag-and-drop form builder that makes it easy to customize the appearance and fields, and also allows you to set up spam protection and approval flows with just one click.</p>
<p class="wp-block-paragraph">The basic functions and overall picture of Ultimate Member are explained in detail in the overview article below.</p>
<div class="wp-block-vk-blocks-spacer vk_spacer vk_spacer-type-margin-top"><div class="vk_block-margin-sm--margin-top"></div></div>
<div class="wp-block-vk-blocks-select-post-list vk_posts vk_posts-postType-post vk_posts-layout-media vk_postList"><div id="post-868" class="vk_post vk_post-postType-post media vk_post-col-xs-12 vk_post-col-sm-12 vk_post-col-md-12 vk_post-col-lg-12 vk_post-col-xl-12 vk_post-col-xxl-12 post-2271 post type-post status-publish format-standard has-post-thumbnail hentry tag-matching-site-construction tag-ultimate-member-en tag-ultimate-member"><div class="vk_post_imgOuter media-img" style="background-image:url(https://wakatchi.dev/wp-content/uploads/2023/10/um-overview-1024x683.jpg)"><a href="https://wakatchi.dev/en/ultimate-member-overview/"><img width="300" height="200" src="https://wakatchi.dev/wp-content/uploads/2023/10/um-overview-300x200.jpg" class="vk_post_imgOuter_img wp-post-image" alt="" srcset="https://wakatchi.dev/wp-content/uploads/2023/10/um-overview-300x200.jpg 300w, https://wakatchi.dev/wp-content/uploads/2023/10/um-overview-600x400.jpg 600w, https://wakatchi.dev/wp-content/uploads/2023/10/um-overview-1024x683.jpg 1024w, https://wakatchi.dev/wp-content/uploads/2023/10/um-overview-768x512.jpg 768w, https://wakatchi.dev/wp-content/uploads/2023/10/um-overview-1536x1024.jpg 1536w, https://wakatchi.dev/wp-content/uploads/2023/10/um-overview.jpg 1920w" sizes="(max-width: 300px) 100vw, 300px" /></a></div><!-- [ /.vk_post_imgOuter ] --><div class="vk_post_body media-body"><h5 class="vk_post_title media-title"><a href="https://wakatchi.dev/en/ultimate-member-overview/">マッチングサイトをWordPressで無料で構築できるUltimate Memberを調べてみた</a></h5><div class="vk_post_date media-date published">2023年10月28日</div><p class="vk_post_excerpt media-text">WordPressでマッチングサイトを手軽に構築できることをご存じでしょうか?多くの拡張プラグインが用意されており、マッチングサイトの要件に応じて柔軟に構築できるUltimate Memberをご紹介します。</p></div><!-- [ /.media-body ] --></div><!-- [ /.media ] --></div>
<div class="wp-block-vk-blocks-spacer vk_spacer vk_spacer-type-margin-top"><div class="vk_block-margin-sm--margin-top"></div></div>
<p class="wp-block-paragraph">In this series, we will focus on creating and optimizing membership registration forms through a hands-on approach.</p>
<div class="wp-block-vk-blocks-spacer vk_spacer vk_spacer-type-margin-top"><div class="vk_block-margin-sm--margin-top"></div></div>
<div class="wp-block-vk-blocks-border-box vk_borderBox vk_borderBox-background-transparent has-text-color has-pale-cyan-blue-color is-style-vk_borderBox-style-solid-kado-tit-tab"><div class="vk_borderBox_title_container has-background has-pale-cyan-blue-background-color"><i class=""></i><h4 class="vk_borderBox_title"><strong>この記事は次のような方にお勧めです</strong></h4></div><div class="vk_borderBox_body">
<ul class="wp-block-list">
<li>Those who want to build a membership site using WordPress</li>
<li>Those who want to easily create and customize membership registration forms</li>
<li>Those who want to easily introduce features such as email authentication and role management</li>
<li>Those who want to efficiently set up spam countermeasures and approval flows</li>
<li>Those who are considering introducing Ultimate Member but would like to know how to use it</li>
</ul>
</div></div>
<p class="wp-block-paragraph">If you have these needs, this article will serve as a starting point for understanding the basic features of Ultimate Member and how to use it.</p>
<div class="wp-block-vk-blocks-table-of-contents-new vk_tableOfContents vk_tableOfContents-style-default tabs"><div class="tab"><div class="vk_tableOfContents_title">Table of Contents</div><input type="checkbox" id="chck1"><label class="tab-label vk_tableOfContents_openCloseBtn button_status button_status-open" for="chck1" id="vk-tab-label">CLOSE</label><ul class="vk_tableOfContents_list tab_content-open">
<li class="vk_tableOfContents_list_item vk_tableOfContents_list_item-h-2">
<a href="#vk-htags-b8f7d9d7-865e-4d93-88e2-e8e681e56349" class="vk_tableOfContents_list_item_link">
<span class="vk_tableOfContents_list_item_link_preNumber">1. </span>
Why the registration experience is directly linked to CVs
</a>
</li>
<li class="vk_tableOfContents_list_item vk_tableOfContents_list_item-h-3">
<a href="#vk-htags-987f447d-239d-4416-9c4f-838e1cc922bf" class="vk_tableOfContents_list_item_link">
<span class="vk_tableOfContents_list_item_link_preNumber">1.1. </span>
Relationship between form input items and CVR
</a>
</li>
<li class="vk_tableOfContents_list_item vk_tableOfContents_list_item-h-3">
<a href="#vk-htags-7e8be840-2706-426e-a1a9-2bc0f12b7a3e" class="vk_tableOfContents_list_item_link">
<span class="vk_tableOfContents_list_item_link_preNumber">1.2. </span>
Relationship between CTA wording and CVR
</a>
</li>
<li class="vk_tableOfContents_list_item vk_tableOfContents_list_item-h-2">
<a href="#vk-htags-b89f880b-6d93-441f-a231-8679529f3b48" class="vk_tableOfContents_list_item_link">
<span class="vk_tableOfContents_list_item_link_preNumber">2. </span>
[Step 1] Call up the form template
</a>
</li>
<li class="vk_tableOfContents_list_item vk_tableOfContents_list_item-h-2">
<a href="#vk-htags-2ec1c667-e737-4608-a2a6-9250bbdc570c" class="vk_tableOfContents_list_item_link">
<span class="vk_tableOfContents_list_item_link_preNumber">3. </span>
[Step 2] Information design with 20+ custom fields
</a>
</li>
<li class="vk_tableOfContents_list_item vk_tableOfContents_list_item-h-2">
<a href="#vk-htags-43e2ed52-1909-4897-a40f-c172adeac6ff" class="vk_tableOfContents_list_item_link">
<span class="vk_tableOfContents_list_item_link_preNumber">4. </span>
[Step 3] Streamline your form with conditional branching
</a>
</li>
<li class="vk_tableOfContents_list_item vk_tableOfContents_list_item-h-3">
<a href="#vk-htags-16c6104f-4afd-4e14-88a2-14a31789915f" class="vk_tableOfContents_list_item_link">
<span class="vk_tableOfContents_list_item_link_preNumber">4.1. </span>
How to set up conditional branching
</a>
</li>
<li class="vk_tableOfContents_list_item vk_tableOfContents_list_item-h-2">
<a href="#vk-htags-a71d56c2-7400-4c00-9b07-698e538c8083" class="vk_tableOfContents_list_item_link">
<span class="vk_tableOfContents_list_item_link_preNumber">5. </span>
[Step 4] Embed the shortcode on a static page
</a>
</li>
<li class="vk_tableOfContents_list_item vk_tableOfContents_list_item-h-2">
<a href="#vk-htags-1fe3d3bc-abbf-4ed7-9c5f-d76f432bcad0" class="vk_tableOfContents_list_item_link">
<span class="vk_tableOfContents_list_item_link_preNumber">6. </span>
Summary and Preview: Approval Flow and Bot Countermeasures
</a>
</li>
</ul></div></div>
<h2 class="wp-block-heading" id="vk-htags-b8f7d9d7-865e-4d93-88e2-e8e681e56349">Summary and Preview: Approval Flow and Bot Countermeasures</h2>
<div class="wp-block-image">
<figure class="aligncenter size-full is-resized"><img src="https://wakatchi.dev/wp-content/uploads/2025/06/ultimate-memter-guide-register-form-image01.webp" alt="A human icon pointing to the sign-up screen and an illustration of a registration form (username, password, and SIGN UP button)" class="wp-image-2264" style="width:481px;height:auto"/></figure>
</div>
<div class="wp-block-vk-blocks-spacer vk_spacer vk_spacer-type-margin-top"><div class="vk_block-margin-sm--margin-top"></div></div>
<p class="wp-block-paragraph">The membership registration form is the "entrance" to your membership site and is an important factor that is directly linked to your conversion rate (CVR).</p>
<p class="wp-block-paragraph">By optimizing your form, you can prevent users from abandoning your page and ensure a smooth path to completing registration.</p>
<h3 class="wp-block-heading" id="vk-htags-987f447d-239d-4416-9c4f-838e1cc922bf">Relationship between form input items and CVR</h3>
<p class="wp-block-paragraph">If there are too many fields to enter, users may give up midway through. For example, there have been cases where reducing the number of fields on a form has improved completion rates.</p>
<p class="wp-block-paragraph">In addition, by taking advantage of the design and structure of your form, you can reduce the psychological burden on users and increase the completion rate. For example, there are cases where changing a one-column form to a two-column form has improved conversion rates by 22%.<br/>(Reference: <a href="https://blog.hubspot.jp/marketing/form-length-isnt-everything-3-other-ways-to-optimize-your-forms-for-conversions" target="_blank" rel="noreferrer noopener nofollow">How to increase the conversion rate of your contact form? Explaining six points for improvement <i class="fa-solid fa-arrow-up-right-from-square" aria-hidden="true"></i></a>)</p>
<p class="wp-block-paragraph">The user registration form is the entry point to your membership site and has a significant impact on your conversion rate (CVR).</p>
<h3 class="wp-block-heading" id="vk-htags-7e8be840-2706-426e-a1a9-2bc0f12b7a3e">Relationship between CTA wording and CVR</h3>
<p class="wp-block-paragraph">Being specific with your call to action (CTA) buttons can encourage users to take action and improve conversion rates.</p>
<p class="wp-block-paragraph">For example, changing the wording from "Buy" to "Buy now and get 10% off" to include a more specific benefit can improve click-through rates. (Reference: <a href="https://mag.ibis.gs/creative/design/cta_190717/" target="_blank" rel="noreferrer noopener nofollow">Effective CTAs | Explanation of button color, text, position, and movement <i class="fa-solid fa-arrow-up-right-from-square" aria-hidden="true"></i></a>)</p>
<p class="wp-block-paragraph">In addition, optimizing the color, placement, size, etc. of your CTA button can help attract user attention and increase click-through rates.</p>
<p class="wp-block-paragraph">As such, optimizing your sign-up form and improving your CTA is crucial to encouraging users to take action and improve your conversion rates.</p>
<p class="wp-block-paragraph">Below, we will explain how to create a membership registration form using Ultimate Member in 4 steps.</p>
<h2 class="wp-block-heading" id="vk-htags-b89f880b-6d93-441f-a231-8679529f3b48">[Step 1] Call up the form template</h2>
<p class="wp-block-paragraph">Ultimate Member forms are created and updated using the form builder.</p>
<div class="wp-block-vk-blocks-step vk_step">
<div class="wp-block-vk-blocks-step-item vk_step_item vk_step_item_lineStyle-default"><div class="vk_step_item_content">
<h4 class="wp-block-heading">Select the Ultimate Member form screen</h4>
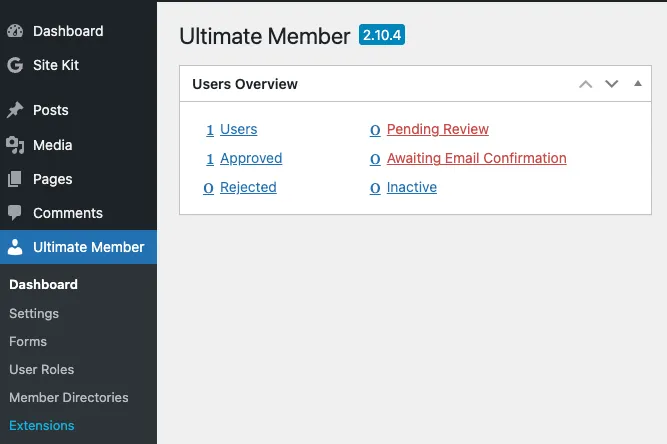
<p class="wp-block-paragraph">From the WordPress dashboard, select "Ultimate Member" → "Forms"</p>
<figure class="wp-block-image size-large"><img src="https://wakatchi.dev/wp-content/uploads/2025/06/ultimate-memter-guide-register-form-02-en.webp" alt="WordPress Ultimate Member dashboard showing user status statistics" class="wp-image-2227"/><figcaption class="wp-element-caption">User status overview displayed in Ultimate Member's admin dashboard</figcaption></figure>
</div><div class="vk_step_item_dot vk_step_item_style-outlined has-text-color has-luminous-vivid-orange-color"><div class="vk_step_item_dot_caption">ステップ</div><div class="vk_step_item_dot_num">1</div></div></div>
<div class="wp-block-vk-blocks-step-item vk_step_item vk_step_item_lineStyle-default"><div class="vk_step_item_content">
<h4 class="wp-block-heading">Enter the form title and select the form type</h4>
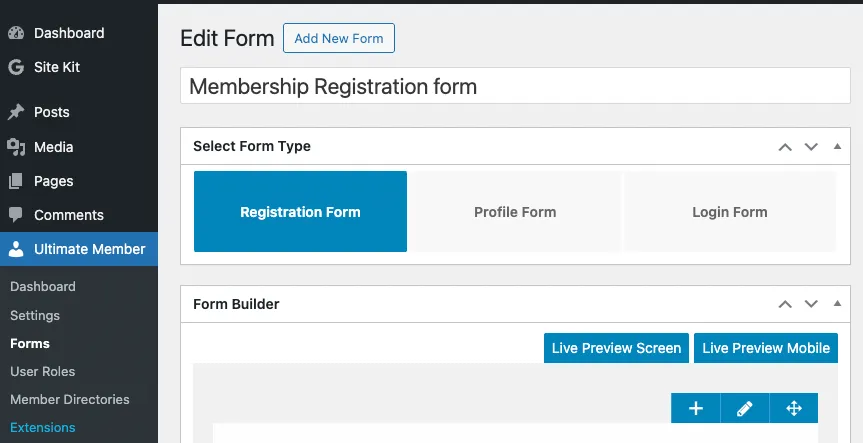
<p class="wp-block-paragraph">Click "Add new form" and enter a title for your form.<br/>(Example: "Membership registration form")</p>
<figure class="wp-block-image size-large"><img src="https://wakatchi.dev/wp-content/uploads/2025/06/ultimate-memter-guide-register-form-03-en.webp" alt="The screen for creating a new registration form in Ultimate Member. "Registration Form" is selected as the form type." class="wp-image-2230"/><figcaption class="wp-element-caption">The screen for creating a new member registration form in Ultimate Member</figcaption></figure>
<p class="wp-block-paragraph">Also, select "Registration Form" under "Select Form Type" and click "Update".</p>
</div><div class="vk_step_item_dot vk_step_item_style-outlined has-text-color has-luminous-vivid-orange-color"><div class="vk_step_item_dot_caption">ステップ</div><div class="vk_step_item_dot_num">2</div></div></div>
<div class="wp-block-vk-blocks-step-item vk_step_item vk_step_item_lineStyle-none"><div class="vk_step_item_content">
<h4 class="wp-block-heading">Form builder will appear</h4>
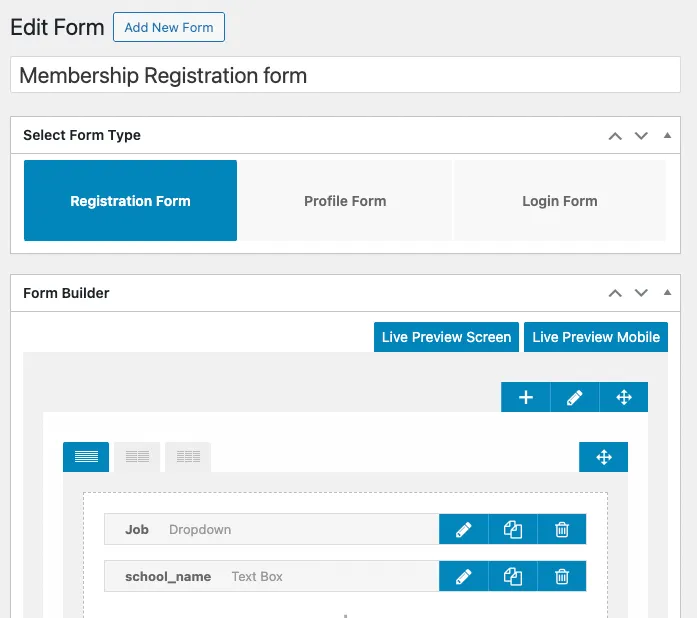
<p class="wp-block-paragraph">This will take you to the form builder, where you can add and reorder fields by dragging and dropping.</p>
<figure class="wp-block-image size-large"><img src="https://wakatchi.dev/wp-content/uploads/2025/06/ultimate-memter-guide-register-form-04-en-1.webp" alt="Membership registration form builder with occupation and school name fields" class="wp-image-2258"/><figcaption class="wp-element-caption">Registration form consists of two items: occupation and school name</figcaption></figure>
</div><div class="vk_step_item_dot vk_step_item_style-outlined has-text-color has-luminous-vivid-orange-color"><div class="vk_step_item_dot_caption">ステップ</div><div class="vk_step_item_dot_num">3</div></div></div>
</div>
<p class="wp-block-paragraph">The form builder lets you intuitively create forms without writing any code, with 1-4 column grid layouts and a real-time preview of the final result.</p>
<h2 class="wp-block-heading" id="vk-htags-2ec1c667-e737-4608-a2a6-9250bbdc570c">[Step 2] Information design with 20+ custom fields</h2>
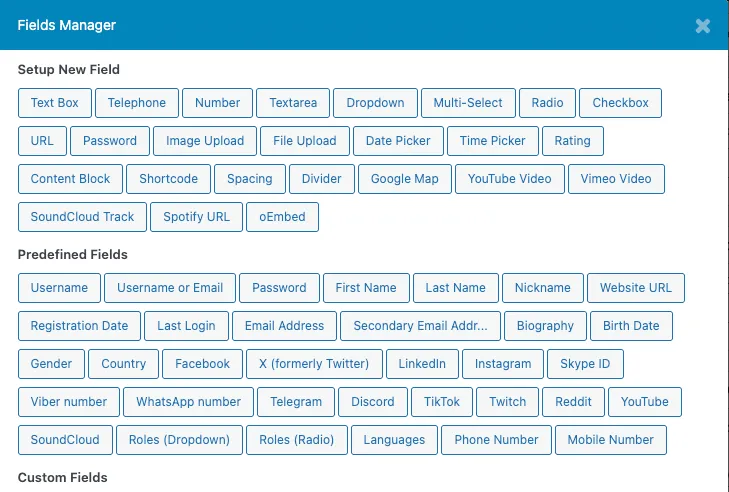
<p class="wp-block-paragraph">Ultimate Member offers a variety of field types including:</p>
<ul class="wp-block-list">
<li>text box</li>
<li>check box</li>
<li>radio button</li>
<li>dropdown list</li>
<li>date picker</li>
<li>Image upload</li>
</ul>
<p class="wp-block-paragraph">For each field, the following settings are available:</p>
<ul class="wp-block-list">
<li>Label (display name)</li>
<li>Placeholder (example)</li>
<li>Required/Optional Settings</li>
<li>Show/hide condition settings</li>
</ul>
<p class="wp-block-paragraph">These settings enable you to design forms that are easy for users to complete and efficiently collect the required information.</p>
<h2 class="wp-block-heading" id="vk-htags-43e2ed52-1909-4897-a40f-c172adeac6ff">[Step 3] Streamline your form with conditional branching</h2>
<p class="wp-block-paragraph">Ultimate Member's conditional branching feature allows you to dynamically control which fields are displayed based on user selections.</p>
<h3 class="wp-block-heading" id="vk-htags-16c6104f-4afd-4e14-88a2-14a31789915f">How to set up conditional branching</h3>
<div class="wp-block-vk-blocks-step vk_step">
<div class="wp-block-vk-blocks-step-item vk_step_item vk_step_item_lineStyle-default"><div class="vk_step_item_content">
<h4 class="wp-block-heading">Select the field to set the condition</h4>
<p class="wp-block-paragraph">In the form builder, click the edit icon of the field for which you want to set conditions.</p>
<figure class="wp-block-image size-large"><img src="https://wakatchi.dev/wp-content/uploads/2025/06/ultimate-memter-guide-register-form-05-en.webp" alt="" class="wp-image-2240"/></figure>
</div><div class="vk_step_item_dot vk_step_item_style-outlined has-text-color has-luminous-vivid-orange-color"><div class="vk_step_item_dot_caption">ステップ</div><div class="vk_step_item_dot_num">1</div></div></div>
<div class="wp-block-vk-blocks-step-item vk_step_item vk_step_item_lineStyle-default"><div class="vk_step_item_content">
<h4 class="wp-block-heading">Enable condition settings</h4>
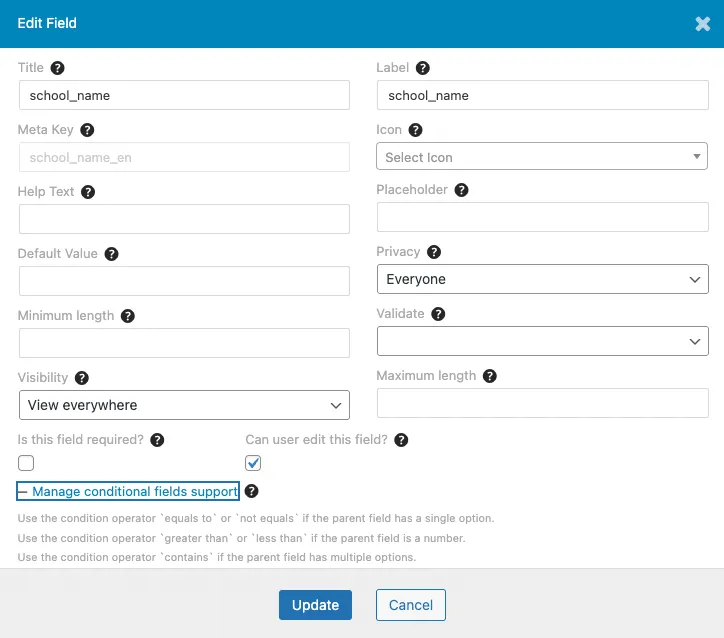
<p class="wp-block-paragraph">Click Manage conditional fields support to enable conditional settings.</p>
<figure class="wp-block-image size-large"><img src="https://wakatchi.dev/wp-content/uploads/2025/06/ultimate-memter-guide-register-form-06-en.webp" alt="School name field detailed settings screen (label, meta key, display conditions, etc.)" class="wp-image-2249"/></figure>
</div><div class="vk_step_item_dot vk_step_item_style-outlined has-text-color has-luminous-vivid-orange-color"><div class="vk_step_item_dot_caption">ステップ</div><div class="vk_step_item_dot_num">2</div></div></div>
<div class="wp-block-vk-blocks-step-item vk_step_item vk_step_item_lineStyle-default"><div class="vk_step_item_content">
<h4 class="wp-block-heading">Add new condition</h4>
<p class="wp-block-paragraph">Click the + icon to add a new condition.Click the + icon to add a new condition.</p>
</div><div class="vk_step_item_dot vk_step_item_style-outlined has-text-color has-luminous-vivid-orange-color"><div class="vk_step_item_dot_caption">ステップ</div><div class="vk_step_item_dot_num">3</div></div></div>
<div class="wp-block-vk-blocks-step-item vk_step_item vk_step_item_lineStyle-none"><div class="vk_step_item_content">
<h4 class="wp-block-heading">Set conditions</h4>
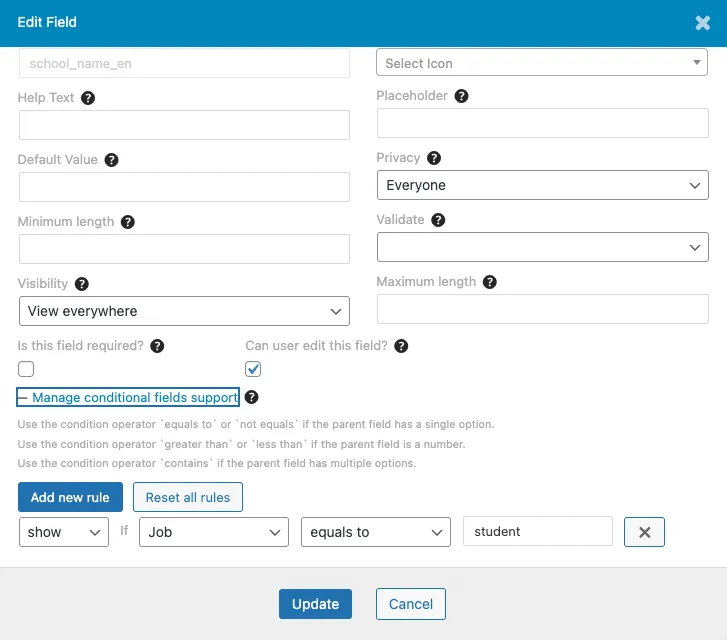
<p class="wp-block-paragraph">Configure the following items:</p>
<p class="wp-block-paragraph"><strong>Value</strong>: Enter the value to be the condition.</p>
<p class="wp-block-paragraph"><strong>Action</strong>: Select "Show" or "Hide"</p>
<p class="wp-block-paragraph"><strong>Field selection</strong>: Select the field on which the condition is based</p>
<p class="wp-block-paragraph"><strong>Operator</strong>: Select "Equals to", "Not equals", "Greater than", etc.</p>
<figure class="wp-block-image size-large"><img src="https://wakatchi.dev/wp-content/uploads/2025/06/ultimate-memter-guide-register-form-07-en.webp" alt="Setting a condition to display the school name field when the "occupation" in the member registration form is "student"" class="wp-image-2252"/></figure>
</div><div class="vk_step_item_dot vk_step_item_style-outlined has-text-color has-luminous-vivid-orange-color"><div class="vk_step_item_dot_caption">ステップ</div><div class="vk_step_item_dot_num">4</div></div></div>
</div>
<p class="wp-block-paragraph">For example, you can set the "School Name" field to be displayed only if "Student" is selected in the "Occupation" field.</p>
<p class="wp-block-paragraph">By utilizing this function, you can display only the information that is necessary for users and reduce the burden of filling out forms.</p>
<h2 class="wp-block-heading" id="vk-htags-a71d56c2-7400-4c00-9b07-698e538c8083">[Step 4] Embed the shortcode on a static page</h2>
<p class="wp-block-paragraph">To display the registration form you created on your site, simply embed the shortcode on a static page.</p>
<div class="wp-block-vk-blocks-step vk_step">
<div class="wp-block-vk-blocks-step-item vk_step_item vk_step_item_lineStyle-default"><div class="vk_step_item_content">
<h4 class="wp-block-heading">Select the field to set the condition</h4>
<p class="wp-block-paragraph">From your WordPress dashboard, select “Static Pages” → “Add New”.</p>
</div><div class="vk_step_item_dot vk_step_item_style-outlined has-text-color has-luminous-vivid-orange-color"><div class="vk_step_item_dot_caption">ステップ</div><div class="vk_step_item_dot_num">1</div></div></div>
<div class="wp-block-vk-blocks-step-item vk_step_item vk_step_item_lineStyle-default"><div class="vk_step_item_content">
<h4 class="wp-block-heading">Enable condition settings</h4>
<p class="wp-block-paragraph">Enter a title for the page (e.g., "New Member Signup").</p>
</div><div class="vk_step_item_dot vk_step_item_style-outlined has-text-color has-luminous-vivid-orange-color"><div class="vk_step_item_dot_caption">ステップ</div><div class="vk_step_item_dot_num">2</div></div></div>
<div class="wp-block-vk-blocks-step-item vk_step_item vk_step_item_lineStyle-none"><div class="vk_step_item_content">
<h4 class="wp-block-heading">Add new condition</h4>
<p class="wp-block-paragraph">Enter the following shortcode in the body area:</p>
<div class="hcb_wrap"><pre class="prism line-numbers lang-php" data-lang="PHP"><code>[ultimatemember form_id="フォームID"]</code></pre></div>
<p class="wp-block-paragraph">*Please replace "Form ID" with the ID of the form you created.</p>
<ol start="4" class="wp-block-list">
<li>Once you publish your page, the sign-up form will appear in the location you specified.</li>
</ol>
</div><div class="vk_step_item_dot vk_step_item_style-outlined has-text-color has-luminous-vivid-orange-color"><div class="vk_step_item_dot_caption">ステップ</div><div class="vk_step_item_dot_num">3</div></div></div>
</div>
<p class="wp-block-paragraph">This allows users to create accounts directly from the frontend.</p>
<h2 class="wp-block-heading" id="vk-htags-1fe3d3bc-abbf-4ed7-9c5f-d76f432bcad0">Summary and Preview: Approval Flow and Bot Countermeasures</h2>
<p class="wp-block-paragraph">In the next installment of this series, we will discuss configurations that can improve the security and quality of your registration forms.</p>
<ul class="wp-block-list">
<li>How to set up email authentication and administrator approval</li>
<li>Bot protection using Cloudflare Turnstile and Google reCAPTCHA</li>
<li>Redirection settings and automatic assignment of user roles after registration</li>
</ul>
<p class="wp-block-paragraph">By configuring these settings, you can prevent spam registrations and build a reliable membership site.</p>
<div class="wp-block-vk-blocks-balloon vk_balloon vk_balloon-position-left vk_balloon-type-speech vk_balloon-animation-none"><div class="vk_balloon_icon"><figure><img class="vk_balloon_icon_image vk_balloon_icon_image-type-normal " src="https://wakatchi.dev/wp-content/uploads/2022/07/wakatchi_icon_2.jpg" alt=""/><figcaption class="vk_balloon_icon_name">わかっち</figcaption></figure></div><div class="vk_balloon_content_outer"><div class="vk_balloon_content has-background-color has-luminous-vivid-amber-background-color "><span class="vk_balloon_content_before has-text-color has-luminous-vivid-amber-color"></span><span class="vk_balloon_content_after "></span>
<p class="wp-block-paragraph">Thank you for reading! Next time I'll be taking on the challenge of "spam prevention and automatic sorting" 💡</p>
</div></div></div>
<p class="wp-block-paragraph">I hope this article is of some help.</p>
<p class="wp-block-paragraph">Thank you for reading to the end!</p>
<p class="wp-block-paragraph">Please also take a look at this short 1-minute video!</p>
<figure class="wp-block-embed is-type-video is-provider-youtube wp-block-embed-youtube wp-embed-aspect-16-9 wp-has-aspect-ratio"><div class="wp-block-embed__wrapper">
<iframe title="Ultimate Memberで簡単作成!4ステップ会員登録フォーム設定ガイド【WordPress】" width="1140" height="641" src="https://www.youtube.com/embed/JBOviOlTreg?feature=oembed" frameborder="0" allow="accelerometer; autoplay; clipboard-write; encrypted-media; gyroscope; picture-in-picture; web-share" referrerpolicy="strict-origin-when-cross-origin" allowfullscreen></iframe>
</div></figure>
When setting up a membership site using WordPress, one of the first challenges you will face is “building a membership registration form.”
Although it is possible to manually implement email authentication, role assignment, custom field collection, etc. using PHP, it is not a realistic option when considering maintainability and development costs.
One plugin that is attracting attention is the membership site building plugin "Ultimate Member."
This plugin is known as an “all-purpose form maker” that comes with a drag-and-drop form builder that makes it easy to customize the appearance and fields, and also allows you to set up spam protection and approval flows with just one click.
The basic functions and overall picture of Ultimate Member are explained in detail in the overview article below.
Summary and Preview: Approval Flow and Bot Countermeasures
The membership registration form is the "entrance" to your membership site and is an important factor that is directly linked to your conversion rate (CVR).
By optimizing your form, you can prevent users from abandoning your page and ensure a smooth path to completing registration.
Relationship between form input items and CVR
If there are too many fields to enter, users may give up midway through. For example, there have been cases where reducing the number of fields on a form has improved completion rates.
In addition, by taking advantage of the design and structure of your form, you can reduce the psychological burden on users and increase the completion rate. For example, there are cases where changing a one-column form to a two-column form has improved conversion rates by 22%. (Reference: How to increase the conversion rate of your contact form? Explaining six points for improvement )
The user registration form is the entry point to your membership site and has a significant impact on your conversion rate (CVR).
Relationship between CTA wording and CVR
Being specific with your call to action (CTA) buttons can encourage users to take action and improve conversion rates.